Saturday, 30 December 2017

How can you make stone without stone?

Sounds impossible, right?

Well technically it is but with the help of amazing Powertex Universal Medium and Stone Art powder and a few sprays of bister you can create fake stone that looks remarkably like the real thing.

This ‘stone heart’ started off as a simple polystyrene shape.


I made this ‘stone’ wreath in the same way then created clay from the Powertex medium and stone art powder. I then used the clay to make the leaves and hold the plaster cherub in place.


If you’d like to try Powertex Stone Art for yourself we have a brilliant workshop coming up on 20th January at Craftsite, Cramlington where you will make a fabulous ‘Percy Penguin’ statue.

Book your place online at www.craftsite.co.uk or message us for details.

Friday, 22 December 2017

Woah....What a Year!

Here I am, sitting in the shop on our last working day before we close for Christmas and suddenly I realise that I haven't blogged for about 5 months!!

Why, I ask you say? How can I let you all down like this? Have I deserted you? NO!

I've had a real mad last half of the year!

Last time we spoke I had just become a certified Powertex Tutor (yay!!) well since then not only have I run oodles of Powertex workshops (as well as all the other art journaling, card making & mixed media classes I do) but I have also become Level 2 Certified meaning I now teach Stone Art too!.

Rather than waffle on about what I've been up to I thought I'd show you so here is a sneak peak into my crazy, messy world over the last 5 months....

Powertex Dream Catcher


Powertex Green Man Garden Plaque

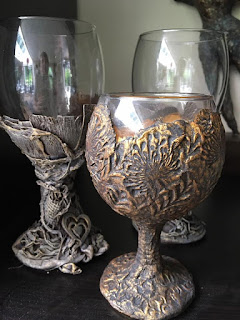
Powertex Goblets

Having fun in a Powertex workshop


Powertex Fairy Houses

Stoner Art Heart

Art Journaling (classes at Craftsite every other Thursday)

Powertex Lantern

Powertex Christmas Robin

Powertet Hartley Hare
(workshop at Craftsite on Friday 12th January)
Book Here

Mucky Mitts Kids Club
Powertex Ivory Angel
Powertex Magic Wand
Mucky Mitts Kids with their Magic Wands
Papercraft Christmas Decorations

Stone Art Seahorse

Stone Art Cherub Wreath

Cardmaking Class every Tuesday & Thursday morning at Craftsite

A bit of paper folding

Art Journalling

Book Folding Christmas Tree

Powertex Christmas Baubles

Powertex Garden Plaque

Mucky Mitts Playing with Powertex

Mixed Media Canvas

Mixed Media Journals

Percy Penguin
Workshop at Craftsite on Saturday 20th January.
Book Here

So that's just a little of what I've been up to whilst I've been away.
If you'd like to know more, or find out about my classes & workshops follow me on social media.

   
@powertex_ne


Have a great Christmas & a very crafty 2018!


Sunday, 9 July 2017

How To Fall In Love - With Powertex!

Hi Everyone,

What a week it has been!

You know how I've been playing with Powertex? Well that relationship between me and the waterbased, non-toxic & environmentally friendly sculpting medium took a huge step forward this week and I'm delighted to tell you that Powertex & I are now in a long term relationship. This week I became a Certified Powertex Tutor!


To gain my certification I had to drive down to Powertex UK's HQ just outside Redditch. There, I and 11 others met with Tracey Evans, the fabulously talented lady behind PowertexUK.  Tracey was so inspiring, and her workshop is packed to the rafters with the most amazing Powertex art. Here are just a few of her amazing creations.

Powertex Bauble by Tracey Evans

African Lady in Powertex by Tracey Evans

Powertex Wine Glasses by Tracey Evans

Turquiose Powertex Figurine by Tracey Evans

Over two day's Tracey guided us through lots of techniques and taught us all about Powertex. It really is amazing what this product can do and it's so easy to use that even children can, under supervision, create amazing pieces of art. And did you know that after 3 weeks Powertex is weatherproof (with the exception of the transparent version) and can be displayed outside?

To gain my certification I had to produce 5 pieces of Powertex art over the 2 days which is no mean feat especially given the 30 degrees plus temperature those days and Frankie's bowel issues (that's Tracey's dog, not another one of our group!). With Tracey's expert help, and copious cups of coffee supplied by the fabulous team at Powertex HQ (big shout out to Garry, Chloe, Claire & Michelle) the 5 projects where completed.

I'm only giving you little glimpses of some of my projects as it was such a hectic couple of days that I forgot to take photos but I will share the others in later blogs.

Powertex Fairy House By Wendy Reed

Powertex Testube Vase Canvas By Wendy Reed

Powertex Bottle Close-up By Wendy Reed
Now that I am a certified Powertex Tutor I will be offering workshops, classes, demonstrations and Poweretex Parties at my workshop in Craftsite, Cramlington Northumberland or in your own homes / craft group premises. 
If you would be interested in trying Powertex please get in touch with me at sales@craftsite.co.uk.
See you all next week!


Sunday, 2 July 2017

What Do You Do When You Love Your Boots...

...but they are falling apart?
Simple - make them into art!

Have you ever found the perfect pair of shoes or boots? I have. They were my Roxy Storm ankle boots. I found them in a little shop whilst on holiday in the USA  a few years back and I loved those boots.
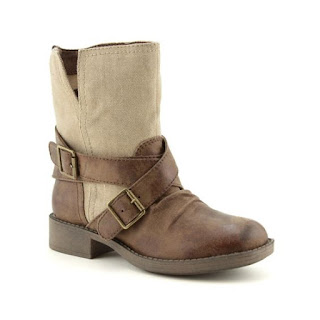
Roxy Storm Boots
Roxy 'Storm' Boots
Mr Crafty Hands referred to them as my 'Star Wars' boots. They were the best. I wore them day in, day out until eventually they fell apart. I was heart broken and couldn't bring myself to throw them away so they stayed in the bottom of my wardrobe until one day I had an idea.

It came to me when I decided to try out Finnabair's Rust Pastes for the first time. I wanted to upcycle an old chocolate box into a rusty looking old storage box (you know how I love to upcyle - remember the frying pan?). I like to add something personal or that has meaning to all my projects and what better to add than parts of my old Roxy boots?

So out came the good old black Pebeo Gesso and I gave the box a quick once over with that then started adding embellishments using Finnabair's Soft Gel Medium
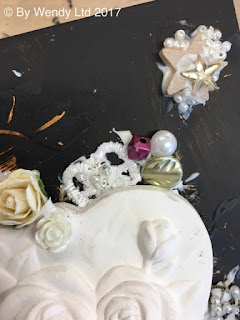
Adding embellishments from my scavenger jar.
Adding embellishments from my scavenger jar. 

To find embellishments I raided my scavenger jar. Everyone needs a scavenger jar! It's a jar or pot you keep handy and pop in anything you think you could use in a mixed-media project - bottle tops, buttons, broken jewellery, keys... 

Amongst my treasures (or as Mr Crafty Hands calls it - 'junk') I found one of those plaster, fragrance infused pomander things you hang in the wardrobe, beads from a broken necklace, crocodile clips, scraps of lace and much, much more. As you can see I stuck it all onto my box.

Adding embellishments from my scavenger jar.
Lace, beads, photo frame...stick it on!

Can you spot the bits of my Roxy boots?

I decided, as the box was side opening with a hinged lid, I wanted it to look like an old book so I used the straps & buckles off my beloved boots to create this effect. I also added the 'Roxy' logo and zipper from the boots Can you spot them?

Once everything was glued down and dried off I grabbed the black Pebeo Gesso again and painted over everything.
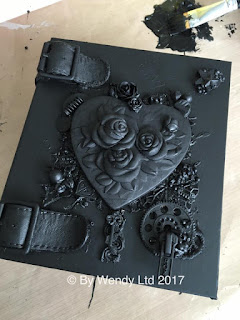
Painted with Pebeo black gesso
I painted everything with black gesso

The next step was to add a little Pebeo Gilding Wax to highlight a few areas. I didn't want too much of this as I wanted the finished project to look very old and rusted but I thought it would be good if the tiniest bits of gold peaked through in places to give the illusion that beneath the rust was an elaborate, valuable treasure.
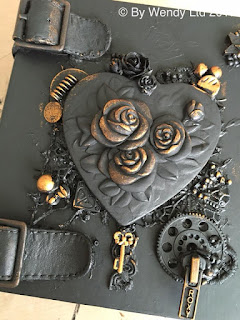
Highlights added with Pebeo Gilding Wax

I actually almost stopped at this point as I loved how the project looked but I carried on nonetheless and got out the rust pastes.
These are a set of 3 pastes in brown, red and yellow. Each has a slightly different texture and when used together create an amazingly realistic rust effect.

I started by stippling on the brown paste (this is the thickest of the 3).
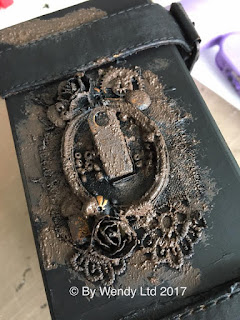
Finnabair rust paste on altered box
Beginning the 'rust' process with brown rust paste

Then I repeated the process with the red paste.
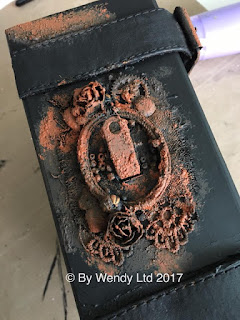
Finnabair rust paste on altered box
Red rust paste stippled onto of brown


Finnabair rust paste on altered box
Building up the layers of rust


Next I stippled on the yellow paste. It was then a case of adding more red and finally more brown until I achieved the desired effect.

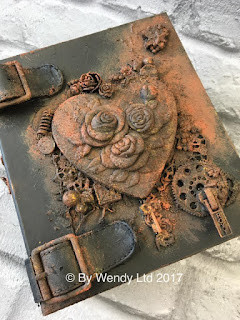
So here it is, my Roxy Storm Boot inspired, rusty old treasure book box!
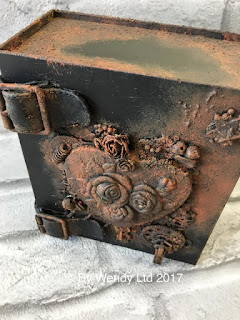

Altered box using Finnabair Rust Pastes

Front of altered box

Side view of mixed media altered box

What do you think?

If you enjoyed this project you can follow my blog by going to bloglovin.com or downloading the Bloglovin' App.

If I have inspired you to try a bit of mixed media you can find the supplies I used in our online shop (just click the links) or pop in and see us at Craftsite in Cramlington, Northumberland if you are passing!

I would love to see your mixed-media art. Please share it on Instagram and tag me @craftsiteshop.