Thursday, 22 June 2017

Getting into Powertex - taking the first steps.

Hi,

As you know I love anything messy and what could be messier than dipping fabrics in gooey, claggy Powertex? So as you can imagine I jumped at the chance of spending a morning with John Glossop and his lovely partner, Heather and a bowl of this amazing fabric hardening product. Check out John's blog - Dreams of Vintopia here.

Powertex
Powertex

Together we set off on my first proper journey into the world of Powertex (ok, I'd dabbled a little previously with my pal, Sue but never done a full sculpture!).

We decided to make figurines and during the morning John showed us how to create a figurine base from a preformed head, a wooden dowel & base, some tinfoil, masking tape and, would you believe, a toilet roller tube!

making a figurine base
A wooden base & dowel covered in toilet roll tubes!

We then affixed the preformed head and 'padded out' our figures with tin foil and covered with masking tape.

making a figurine base
My lady is taking shape!

making a figurine base
Clearly I modelled her figure on my own (in my dreams!)

Now the messy part! We covered our figures in pieces of fabric soaked in Powertex (this comes in lots of colours but we chose to use the bronze which looks just like runny Nutella). 

Making a figurine sculpture using Powertex
 It's amazing what you can do with a bit of old t-shirt, string & lace

Making a figurine sculpture using Powertex
 Can you believe the wrap is dishcloth material? I love the way it hang

Figurine sculpture made using Powertex
A scrap of old lace transformed with Powertex.

We dried our sculptures off with hair driers (heat tools are too hot) until they had stiffened then dry brushed with some pigment powder mixed in a drop of varnish and voila! One elegant lady created from scraps & Powertex.
Did you know that after 3 weeks drying time Powertex sculptures are weatherproof so can be displayed outside?

Figurine sculpture made using Powertex

Figurine sculpture made using Powertex

Figurine sculpture made using Powertex

Figurine sculpture made using Powertex

Figurine sculpture made using Powertex

Safe to say, I have now got the Powertex bug (John told me it would be addictive and it is!). So much so that I will be heading down to Powertex HQ in early July to get my Powertex Tutor Certification (yes, I will be truly certifiable!) then I will be running lots of Powertex workshops here at Craftsite and Powertex products will be available in the shop and online.

Over the next couple of blogs I will share with you a few pieces I have made using Powertex including a Harry Potter magic wand and an upcycled frying pan!

What would you like to make using Powertex? Let me know in the comments below...


Monday, 12 June 2017

Hello!
It's been a while since my last crafty blog as I've been tied up with other commitments but it's so good to be back doing what I love!

This week I've been mixing up a lot of products designed by the lovely Anna Dabrowska, otherwise known as Fannabair.

If you know me then you will know I am obsessed with all things beach & sea so I decided that I wanted to make a little undersea treasure that looked like it had laid undisturbed at the bottom of the sea for years. What better to begin with than a fishy tin!

 Firstly I added some pieces of wood to the tin so that I could bring the focal piece I was adding forward a bit.
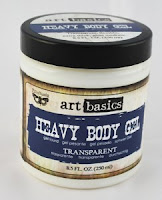
 I then added some mesh, art stones and a variety of embellishments using Art Basic's Gel. I also glued some twisted cord around the open edge of the tin. I had a seahorse key I wanted to use as the main focal point. Once dry I painted them all with white gesso.
 I then used some Indigo Blu metallic acrylic paints in 'Kingfisher Blue' & 'Goldfinger' to some areas of my piece to pick out certain parts and embellishments.

 Next I splattered my work with a wash of the Kingfisher Blue and again with a wash of white gesso. The Tim Holtz splatter brush is brilliant for this.
 At this point I decided that I wanted the cord around the edge of the box to work as a frame and needed it darker

 so I painted it with black gesso 
  then applied Pebeo gold gilding wax with my finger.
 I then got out the Finnabair Patina Pastes.Wow! I love this set. I applied the coper paint first using an old, firm paintbrush to stipple it on. Whilst it was still wet I repeated the process with the blue and then finally the green paints. Together they give a great verdigris effect to the tin.

 Next I used Finnabair's rust pastes to add areas of rust to the edges and a couple of other areas of the tin. 

If you have been inspired to try a little mixed media for yourself I would love to see your art. Please share it on Instagram and tag me @craftsiteshop.


Saturday, 17 December 2016

Altered Bottle


 Hello again!
Welcome to this week's blog where I want to share with you an altered bottle I created.
My inspiration was shipwreck treasure found under the sea. I wanted the piece to use blues (my favourite colour) and purples, and to have a lot of texture.


 To begin I took an empty wine bottle and used Art Basics Soft Gloss Gel to cover it with a base layer of burlap.


This was just to give the bottle texture so that my next layers would stick to it better.


I then cut up strips of old fabric and lace. I dipped these in Finnabair's Sculpture Medium (natural beige) which I diluted about 50-50 with water. I squeezed off excess medium then added the fabric strips to the bottle. I made sure to fold and crinkle the fabric for texture. I used dollops of Heavy Body Gel to hold the fabric in place where I felt it was needed.


Next I added embellishments from my stash along with Malange Pebbles, art stones and mini art stones, again using the heavy body gel. I allowed everything to dry overnight.


Once the piece was completely dry the sculpting medium had stiffened the fabric. I then sprayed the bottle with inks from Dylusions


You will see that the dye did not immediately soak into the fabric. That was ok, as I next dry brushed the piece with a white gesso wash. This spread the dye over the whole piece.

It is important when using this dry brushing technique to keep cleaning your brushes or you will end up with your work all one homogenous colour rather than the areas of different colours.

I kept repeating the dry brushing, drying the work with my heat tool in between layers, until I was happy with the colours.


You will see how this technique gave definition to the folds in the fabric.

Next I repreated the dry brushing but this time with IndigoBlu Goldfinger acrylic paint to add a touch of richness to the bottle.


I also used this to paint the embellishments and some cord I had twisted around the neck of the bottle so they stood out.

After this, I splattered paints onto the bottle using my Tim Holtx Splatter Brush.


I used Titanium White acrylic paint and IndigoBlu Goldfiner, Aladdin and Kingfisher Blue Acrylic for the splattering.


To finish to bottle off I added some of Finnabair's Art Glitter from the Caribbean Seas collection with soft gloss gel.


If you enjoyed this project you can follow my blog by going to bloglovin.com or downloading the Bloglovin' App.

If I have inspired you to try a bit of mixed media you can find the supplies I used in our online shop (just click the links) or pop in and see us at Craftsite in Cramlington, Northumberland if you are passing!

I would love to see your mixed-media art. Please share it on Instagram and tag me @craftsiteshop.