Showing posts with label gilding wax. Show all posts

Sunday, 27 November 2016

Steampunk mini-top hat

Hi everyone,
I can't believe it's blogday again. Where did the week go?
I've been getting messy in the workshop this week steampunking up a mini-top hat favour box I had left over from a wedding.
What do you think?

The favour box was ivory so the first thing I did was cover it with black gesso
I then added a band of fake leather I cut from a strap I salvaged from an old pair of boots (never throw anything out!).


Once the gesso had dried I began to punk up the hat using cogs and elements from my stash including the industrial heart from one of my Finnabair Mechanical's set and a 3 part poinsettia from a Tim Holtz Christmas embellishment set which I put on the top of the hat. 
I also added some chains from a cheap piece of costume jewellery I picked up on sale in Primark from 50p!
I used Art Basics Heavy Body Gel to stick everything as it holds so strong.


I wanted to add a couple of more things that I didn't have ready made in my stash - a clock and some copper piping so I made those myself.
For the clock face I cut a clock from my Tim Holtz Lost & Found paper pad and I stuck it to the bottom of a melange pebble with soft gel paste and left it to one side to dry.
The piping I made by cutting lengths of paper drinking straws then splitting them lengthwise. This allowed me to roll them tight and slide them inside some shorter length of the same paper straws giving me a 'joint' effect.


Once all the gel had dried I grabbed my black gesso again and painted over everything.


The next part is always my favourite. I love taking everything back to black then seeing the details reappear as I apply gilding waxes and paints!

I ran a light coating of Pebeo Renaissance Gold gilding wax over some of the embellishments then took some Art Alchamy Opal Magic in green-gold and dry brushed it across the hat & embellishments.


To finish of I painted the 'pipes' with IndigoBlu Pheasant Bronze acrylic paint and stuck my 'clock' face onto the hat.


Voila! One Steampunk Mini-Top Hat!


I hope you enjoyed this project. 

Don't forget to follow the blog and if I have inspired you to try a bit of mixed media you can find the supplies I used in our online shop (just click the links) or pop in and see us at Craftsite in Cramlington, Northumberland if you are passing!


  I would love to see your mixed-media art. Please share it on Instagram and tag me @craftsiteshop.


Supplies used are available to order from Craftsite.co.uk. Just click the item to go to the website.
Art Basics Heavy Body Gel
Art Basics Soft Matte Gel
Pebeo Gilding Wax
Pebeo  Gesso
IndigoBlu  Acrylic Paint
Tim Holtz Lost & Found Paper Stash


Sunday, 20 November 2016

Mini-Mixed Media in a tin!

Hi everyone, Wendy here again.
Are you a hoarder like me? I can't throw anything away including empty tins and boxes.
So this week, just to prove my husband wrong when he says that I never use all the junk I save, I decided to make a mini-mixed media Christmas tree ornament in a cute little Mento's tin I saved months back.
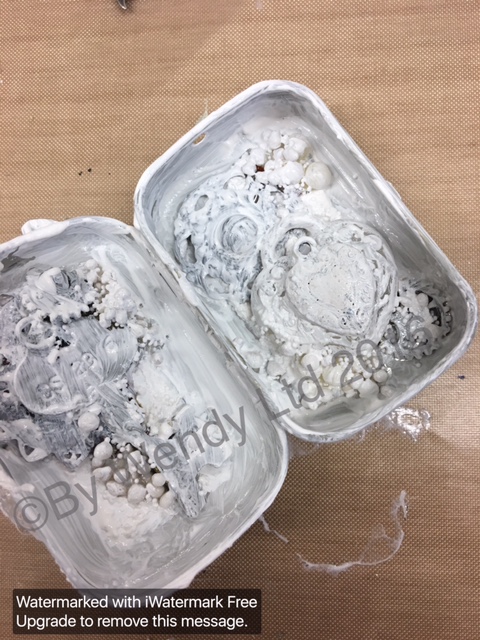
I started off by slapping some rough texture paste onto the inside and outside of the tin and letting it dry. I punched a hole in the top of the inner section of the tin using my Cropadile ready to insert a ribbon for hanging later.


Mentos tin with rough texture paste

Once the texture paste was dry I used Art basics Heavy Body Gel to add embellishments from my stash to the outside of the tin. These included the child's face, melange pebbles and art stones by Finnabair and metal leaves from Tim Holtz.

Add embellishments with Heavy Body Gel

When the gel was dry I opened the tin and added more elements to the inside.


Once all was dry I gave areas of tin or metal still showing a touch of white gesso so my inks in the next stage had something to grip onto.


After a quick blast with my heat tool to make sure the gesso was thoroughly dry, I spritzed the inside and outside of the tin with Dylusions Ink (drying with my heat tool between sprays).


I decided that I wanted the ornament to look as if the closed tin had been lost for years so the colour had faded outside but when it was opened it would reveal vibrant colours.

To get the faded effect I used a technique I picked up from Finnabair during a recent workshop I attended. I used white gesso and dry brushed the outside of the tin. It's important that your brush is pretty dry for this as if wet you will simply move the inks around. I repeatedly dry brushed with white gesso, drying in between each brushing, until I was happy with the level of 'fade' on the tin.

Next, I used Pebeo Rennaisance Gold gilding wax on the tip of my finger to highlight details. To add depth I then dry brushed the whole outside of the tin with Goldfinger acrylic paint from the English Cottage range by Indigoblu.


Once happy with the outside, I opened the tin to reveal the more vibrant colours inside. Again I highlighted with the gilding wax then I added some sparkle using Finnabair's amazing glitters and Soft Matte Gel. The glitters are amazing! I used two shades from the Crimson set and a goldish shade from the Ebony & Ivory set.
To finish off I took some 5mm double sided satin ribbon in scarlet and dry brushed it with the Goldfinger acrylic paint I had used earlier. I simply knotted the ribbon and threaded it through the hole I had punched in the top of the tin.

All ready for my Christmas tree.


If you have been inspired to try a little mixed media for yourself I would love to see your art. Please share it on Instagram and tag me @craftsiteshop.


Supplies used are available to order from Craftsite.co.uk. Just click the item to go to the website.

Art Basics Heavy Body Gel
Art Basics Soft Matte Gel
Pebeo Gilding Wax
Pebeo  Gesso
Goldfinger Acrylic Paint

Finnabair Glitter Crimson

Sunday, 13 November 2016

Easy Mixed Media Starter Project.

Hi everyone, it's Wendy here.
Are you ready to get messy?
When I mention that I love mixed media to people I often get asked two things.
Firstly, what's mixed media? And secondly, is it difficult?
Well, the answer to question one is easy. Mixed media is basically art that involves more than one medium, so a mix of techniques. And is it difficult? No! It's the easiest thing to do as there are no rules. You just dive right in and get going!
To illustrate what I mean here is a simple little mixed media project I did recently.


Isn't it cute? If you know me you will know my favourite place in the whole world is the beach. It's the one place I feel totally stress free and at home so you will find that I often use the beach as inspiration in my art.
To make these little hanging plaques I took small pieces of mount board (you could use a little board canvas either) and I glued down layers of hessian and cotton fabric from my scraps box. I used Soft Matte Gel from Finnabairs Art Basics range to stick down the fabrics and also gave them a quick brush over with the product too to seal them.
Next I chose two seashells from my HUGE collection and stuck them in place with Heavy Body Gel which is another product from Art Basics. This is a really strong glue with the texture of creme brûlée and it will hold just about anything!


I added some crushed seashells inside the big shells with the heavy body gel (although the soft gel would have done either as these aren't too heavy) and I allowed the whole project to dry.
Next I gave everything a good coating of Pebeo black gesso and dried it with my heat tool.
When the gesso was dry I took a small amount of Pebeo gilding wax on my finger and lightly brushed it over the surface of the crushed shells and fabric.


I then selected two of Finnabairs amazing Art Alchemy Opal Magic paints and dry brushed them across the whole of the plaque and on the outer edges of the shells.
Next I added a pearl bead to each shell with the heavy body gel and an inspiring word from my Tim Holtz Big Chat book.


To finish off I punched out two holes with my Cropadile and threaded through some twine to hang the plaques up.
How easy was that?
If you have been inspired to try a little mixed media for yourself I would love to see your art. Please share it on Instagram and tag me @craftsiteshop.


Supplies used are available to order from Craftsite.co.uk. Just click the item to go to the website.

Art Basics Heavy Body Gel
Art Basics Soft Matte Gel
Pebeo Gilding Wax
Tim Holtz Big Chat Stickers
Pebeo Black Gesso